My apologies for the long delay in posts! I October and November were crazy busy with law school applications, a trip to the East Coast (to visit schools) and then the holidays! Hopefully I will get back on track with the new year approaching.
This recipe is very simple and easy to make-- I am posting it per the request of a friend at work, Justin Aida. The method of making the brussel sprouts came from my friend Hadley who is a kitchen diva herself.
Ingredients:
I jar (16oz) of sauerkraut
3-4 potatoes, skinned and cubed (or if you use Yukon Gold or Red potatoes you can leave the skin on).
1 package of vegetarian sausage of your choice, sliced (I prefer a spicy kielbasa type)
1/2 medium onion, sliced
1 pound of fresh brussel sprouts
2 medium shallots, finely sliced
2 Tbs of apple cider vinegar
2-4 tbs of olive oil
Salt and pepper to taste (I like to use Alderwood smoked salt for this dish)
Add sauerkraut (with liquid in jar) and potatoes to a heavy pot and turn heat to medium. Cook, stirring occasionally until the potatoes are fully cooked (pierce easily with a fork).
When potatoes are almost done, heat 2 tbs of olive oil in a heavy frying pan and add onions. Turn heat to low and cook, stirring often until they begin to become translucent. Add the sausage and continue to cook until the pieces are brown and beginning to crisp. Once done, add sausage and onion mix to sauerkraut and potatoes and stir.
Separately, heat remaining olive oil in another heavy pan (cast iron is best) and add shallots. Cook 1-2 minutes until softened. Add brussel sprouts and continue cooking, stirring often until sprouts become a very bright green and begin to carmelize. Add vinegar and continue to cook and stir until sprouts are beginning to brown but still slightly crisp (2-4 minutes). Be careful not to overcook the sprouts so that they end up pale and soggy.
Serve sauerkraut mixture and sprouts together in a big bowl and enjoy! Last time we made this, we had some garlic brushetta on the side which was a killer combo. This makes a great leftover for lunch the next day, as is, or as a modified ruben sandwich. Yum!
Serves about 4-5.
Thursday, December 02, 2010
Sunday, September 26, 2010
Coconut Squash Soup!
This soup brings together elements of various cuisines. Its kind of a Moroccan tangine and Thai curry soup all in one. If you don't like spicy, you can leave out the chili powder and flakes and reduce the Harissa (If you do this, increase the cardamom to kick up the flavor a bit). Also, if you want to do the lowfat/low calories thing, you can leave out the coconut milk and substitute more vegetable broth.
Ingredients
2 TBS of olive oil
1 medium red onion, chopped
2 cloves garlic, minced
4-5 cups of squash (any kind), cooked
1-2 red peppers (roasted or fresh), chopped
1 can of coconut milk
2-3 cups of vegetable stock
1/2 tsp Chipotle chili powder (regular will also do if you don't have it but the Chipotle has a very distinct smoky taste)
5-7 small cardamom seeds(whole green pods), removed from pods and slightly crushed
3 tsp Harissa paste (true Harissa does not have tomatoes in it, but check the label).
1 tsp red pepper flakes
1 tsp salt (more or less to taste)
To cook the squash, cut in half, scoop out the seeds and place face-down on a cookie sheet. Bake in a 350 degree oven for 30-45 minutes until the insides are soft enough to scoop out with a spoon. You can do this up to a couple days in advance if you want. Also, cooked squash keeps really well in the freezer. If you keep some frozen squash around you can throw this soup together super fast whenever you are in a hurry for a meal!
In a soup pot, heat olive oil until fragrant and add onions. Turn heat to medium low and cook for 1-2 minutes, stirring occasionally. Add garlic and cook another 1-2 minutes. Once onions are fully cooked, add squash, vegetable broth, coconut milk and peppers and increase heat to medium to bring soup to a simmer.
Add Chipotle powder and cardamom to soup and cook for 20-30 minutes, until squash is very soft and coming apart.
Remove soup from heat and allow to cool slightly. Using an immersion blender or food processor puree soup until squash is fully incorporated and soup is creamy in texture, adding water or vegetable broth as needed to lighten consistency. Stir in the Harissa.
This recipe will serve 4 people as a main dish. Serve it with some crusty bread and a big salad on the side. Yum!!

Sunday, September 12, 2010
Its Pickle Time!!
My apologies for the long delay in posts! I have been quite busy lately with my law school applications and so the blog has been neglected!
With the garden going crazy and producing more food than we can eat on a good day, it is that time of year again-- time to make pickles! We absolutely love to pickle just about everything and so I thought I would share some of my favorites today.

Pickled Lemon Cucumbers
Lemon cucumbers are a round, yellow and slightly sweet variety of cucumbers that grow really well here in Portland. They are delicious peeled and eaten like a regular cucumber, however they are also very tasty as pickles!
Ingredients-
As many lemon cucumbers as you have. Cut the larger ones into halves or quarters.
Pickling spice mix (1 Tb per quart jar)
Garlic (1-2 cloves per jar)
Brine (mix ratio of 1 cup white vinegar to 1 cup water with 2 Tb of pickling spice per quart size jar and simmer on low until salt is dissolved)
You will also need quart-sized jars, clean rims and new lids.
Sterilize your jars by boiling in water for 5-10 mins. While jars are sterilizing, simmer the lids on medium heat (do not boil).
While jars are still hot, add cucumbers and spices to each jar. Leave 1 inch of space at the top of the jar. Using a ladle, fill the packed jars with brine and wipe the rims with a clean dish towel. Place hot lids on each jar and screw on the rims as firmly as possible.
Place the jars upside down in a big stockpot (or boiling water canner if you are fancy) with enough boiling water to completely cover jar rims. Boil 15 mins to process.
Once jars are done processing, remove and place on a dishtowel to cool. After jars are completely cool, check seals by pressing down in the center of the lid (the middle should not move or push back). If jars have not sealed, you can re-boil them. Also, placing them in the fridge for a few hours can help a jar to seal.
Once all the jars are sealed and cooled, place them in a cool dark place. The pickles will be ready to eat in 4-6 weeks. However, you can save and eat them all winter-- the flavor will just be stronger the longer they sit (though we can never manage to resist eating them all much sooner!)
Delicious!
Next time- Dilly beans and dill pickles!
Thursday, August 19, 2010
Puy Lentil Dahl and grains with kale
Greetings everyone! It has been a while since I have made a post and so I thought I would put this one up. This dish is a variation on a kind of dahl I have been making periodically for a while when there is nothing else in the cupboard!
Ingredients
2-3 TBS of olive oil
1 red onion, chopped
1 tsp whole cardamom pods, slightly crushed and seeds removed
1-2 tsp whole peppercorns
1 tsp whole cumin seeds, crushed
1 1/2 cups of puy (green) lentils
3 cups of water
2 tbs of Bragg's Liquid Aminos
1 zucchini, chopped
2 red peppers, chopped (fresh or roasted)
1 pound of kale, washed and chopped
2 cups of your favorite grain, cooked (I use a brown/wild rice mixture)
In a big skillet, heat oil and add onions. Crush spices coarsely with a mortar and pestle and mix into onions. Cook on med-high heat, stirring frequently for 2-3 minutes. Add lentils and stir so that they are fully coated with oil and onions. Add zucchini and red onion and stir. Add water and Bragg's and turn heat down slightly.
Adding additional water as needed, simmer mixture for 20 mins, stirring occasionally, until lentils are fully cooked (if you are substituting brown lentils make sure not to overcook because they will become very mushy). Add chopped kale and stir quickly until it turns bright green and is soft enough to eat but not completely wilted.
Serve over grains mixture, with hot sauce and more Braggs to taste.
This should make enough for 3-4 people.
Thursday, July 22, 2010
Basic Coleslaw Recipe
This colorful salad is much lighter that your traditional mayo-filled affair. It is also extremely easy to make!
Ingredients
1 small head of green cabbage
1/2 medium red onion, chopped finely
1 large carrot, grated
1/2 cup of fresh or roasted red pepper, chopped finely
1/2 lemon, juiced
3-4 Tbs balsamic vinaigrette (Any homemade or store bought that you like will do, I like to be lazy and use Newman's Own light balsamic vinaigrette.)
Mix vegetables thoroughly in a medium sized bowl. Add lemon juice and stir so that evenly coated. Add a little vinaigrette at a time, stirring so that salad is fully coated but not soggy. Cover and place in fridge for 30 mins to overnight to allow flavors to absorb and cabbage to wilt.
Serves 6-8 as a side dish.

Kale and Lentil Soup
I know it's summer, but this week I came down with a cold and so it's time for soup anyway!
Ingredients-
2 Tbs butter
1/2 red onion, chopped
4-5 cloves garlic, minced
1 large carrot, halved and sliced
1 pound (more or less) of red or white potatoes, cut into small cubes
1 cup Puy (green) lentils
8 cups of rich vegetable stock (more or less)
Approx one pound of kale (any kind), chopped
1/2 cup roasted red peppers, chopped
fresh cheese to melt on top
salt and pepper to taste (I used smoked salt because it is so tasty!)
Braggs amino acids, to taste
In a heavy soup pot, heat butter and add onions. Stir on high for 3-4 minutes until onions begin to turn translucent. Add garlic and carrot and cook for another 2-3 minutes. Add potatoes and lentils and stir until fully coated in butter mixture. Add stock and turn down to simmer. Cover pot and cook for about 30 minutes, until lentils and potatoes are fully cooked but not mushy. Add more stock if needed to keep a goody soup (not stew) consistency.
Remove lid and add kale and roasted peppers. Cook, uncovered, for another 5-10 minutes on low heat until kale is fulled wilted.
Season to taste with salt, pepper, and Braggs. Serve with a couple of slices of melty stinky cheese on tip and some hearty whole grain bread on the side.
This should serve 4-6.

Tuesday, July 20, 2010
Goat Cheese and Fig Summer Salad
This tasty summer salad gets four stars! We threw it together tonight with a few random ingredients that needed to be used up and turned out delicious! The spinach in this salad came from our garden.
Ingredients:
fresh young spinach (or other sweet leafy greens)
purple or Italian kale, cut into small pieces
fresh goat cheese, crumbled into chunks
fresh ripe figs, sliced
courgette, sliced thinly
good balsamic vinegar
Mix ingredients together gently in a bowl and drizzle with vinegar and enjoy!
Ingredients:
fresh young spinach (or other sweet leafy greens)
purple or Italian kale, cut into small pieces
fresh goat cheese, crumbled into chunks
fresh ripe figs, sliced
courgette, sliced thinly
good balsamic vinegar
Mix ingredients together gently in a bowl and drizzle with vinegar and enjoy!
Wednesday, July 07, 2010
Spicy Vegan Bean Burgers
Now that the summer weather has finally arrived here in Portland it is a perfect time to break out the BBQ. These vegan bean burgers are just the ticket!
Ingredients:
4 cups of kidney and black beans, cooked (2 cans, beans rinsed will do).
1/2 cup of red onion, chopped
4-5 cloves of garlic, crushed
1-2 tbs of of Braggs aminos liquids
1 tbs of mesquite seasoning mix
1 tsp of chili flakes (or more or less to taste)
1/2 cup of bread crumbs
1/4 cup of textured vegetable protein (TVP)
Take 2/3 of beans and puree in food processor until smooth, adding the Braggs slowly. In a bowl, mix pureed beans with whole beans. Add onions, garlic and seasonings and mix together thoroughly. Add bread crumbs and TVP as needed, mixing together gently until you can form a ball. With a little whole wheat flour on your hands, gently form patties and place on a cookie sheet. If you cannot get the mix to form into patties that will hold together, you can add a little egg/egg replacer to help make it more sticky. To cook, throw on a barbeque or under a broiler until fully cooked through.
These burgers are really delicious in any sort of sandwich. I personally recommend serving with avocado, chipotle mayo and fresh basil.
Serves 4-6.
Tuesday, June 29, 2010
Basic [Vegan] Pesto
Now, this is sort of cheating, because I have adopted this recipe from this link here. However, it's really basic, versatile, and I use it a lot, so I'd like to share it. Plus, of all the vegan pesto recipes, I like it the best. Non-vegans will like it and won't even know the difference, which is why I hesitate to give it the 'vegan' label that tends to scare people away. It would be great in Alletta's recipe for the Pasta with Goat Cheese and Walnut Pesto.
Ingredients:
About 2 cups fresh basil leaves, rinsed and patted dry
1/3 cup plus 1 tablespoon olive oil
1 heaping cup nuts (pine nuts are best, but they're pricey, so we usually use walnuts, pecans, almonds, or a mix of whatever we have)
5 cloves garlic (I usually use 7 or so, because I'm a garlic lover)
1/3 cup plus 1 tablespoon nutritional yeast
3/4 teaspoon salt
1/2 teaspoon black pepper (to taste)
All you do is mix well in a food processor until it's a lovely, tasty green mush. Usually I have to stir it around a few times to get it just right. My quantities are a little different than the recipe linked to because I like to have a little extra. Why? Because it freezes excellently. I always have some in my freezer to quickly de-thaw and easily add to a meal. It usually lasts us several weeks, then I make more. Trader Joes has a great plastic tub of basil you can buy, if you aren't growing any.
Here are some ideas on what to do with pesto:
-mix with noodles (I like the gluten-free brown rice elbow noodles) and a little nutritional yeast, and maybe a splash of Braggs for some yummy pesto macaroni and "cheese" - or add mozzarella cheese if you prefer.
-spread on a whole wheat tortilla with mozzarella cheese (or vegan "cheese") and grill yourself a pesto quesadilla (or you can use slices of bread to make a grilled cheese sandwich ). Add fresh tomato to make it Caprese style! In fact, it's great as a spread for pretty much any sandwich.
-add globs of it as a pizza topping, or spread it on a pizza crust instead of tomato sauce.
-eat it as a dip with pita chips (this was discovered on accident at one of the 4th of July beach house gatherings). Mmm!
-mix it in with a salad instead of using dressing.
As you can see, it's very versatile, easy to make, easy to store for later, and yummy, which makes it an A+ in my book. Enjoy!
Greetings!
Hello! This is Linda. I was privileged to work with the lovely Alletta last year at a Portland area law firm, and we quickly realized our mutual love for cooking and vegetarianism, among other things. She's entrusted me with the title of co-administrator of this recipe blog, and while I don't think I am quite on par with Alletta's cooking and experience, I'd love to have a place to deposit my "recipes" (if for any reason, because I need to start writing things down more). Maybe I'll start my own blog one of these days, but right now I'll add things as I think of them.
What I eat is really important to me, and pretty much nothing will make me "too busy" to take the time to prepare (or sometimes, let's face it, purchase) a half-decent meal. As a law student though, it's hard to do this, so my focus on recipes is centered around 1) what is relatively quick to make (I say relatively, because I don't count microwaving as making something), 2) what keeps well as leftovers for us to take to work/school for lunch (remember the "student" part? I have no money). We don't eat meat, and generally avoid dairy as well. As a result, we usually end up making some variation of a brown rice stir-fry, but I'll try to be more creative with what I post here :) I also enjoy baking vegan treats, so I might add some of those in here, too. My next foray will hopefully be into the gluten-free baking world.
Anyways, that's me, and hopefully I'll post a couple recipes here soon!
Wednesday, June 09, 2010
Smoky Vegan Chili
We've been making variations of this delicious tomato-free chili for a couple of years. You can vary the ingredients a lot and it will still come out great. It is very quick and easy to make and everybody loves it (meat-eaters included). If you want to use a crock pot, cook the veggies in a frying pan first and then throw it all together.
Ingredients:
2-3 tbs of olive oil
4 sticks of celery, chopped
1 onion, chopped
5 cloves of garlic, minced
1 large carrot, chopped
8 cups of beans, cooked (I like a mix of kidney and black beans)
1 cup of roasted or fresh red peppers, chopped
1 tbs of mesquite seasoning mix
1 tsp of whole cumin, crushed
1/2-1 tsp of Chipotle (or regular hot) chili powder
pinch of smoked salt
2-4 cups of water
dash of Braggs amino liquids
In a big pot, heat the olive oil. Add the onion and cook for 2-3 minutes. Add the celery, garlic and carrots and continue cooking, stirring frequently. After vegetables are softened, add beans, peppers and seasonings. Next, add just enough water to create a chili consistency (not enough to fully cover beans) and add a little Braggs to taste. Cover the pot and let the chili cook for 30+ minutes on medium heat, or as long as you want on a very low simmer (eg. crock pot).
Tips: If you want to make this recipe even more hearty, you can add some TVP (textured vegetable protein) or tempeh right before you add the water.
Once you are ready to serve it up, you can dress up this recipe with some sour cream and cilantro, or even fresh avocado slices. For a full meal, serve with some salad and fresh cornbread on the side.
This should serve about 4.
Wednesday, May 26, 2010
Spiced Lentil and Carrot Soup
This easy-to-make soup became a sort of old standby for us when we lived in London and had to endure terrible rainy, cold weather all the time. Living in Portland, OR, it definitely still gets the job done.
Ingredients-
1 medium white onion, chopped finely
2 tbs of olive oil
4-5 small cardamon pods, crushed
salt and pepper to taste
1 1/2 cups of red lentils
1 red pepper, chopped finely (if it is out of season, approx 1 cup of roasted red peppers chopped will do the job)
5 carrots, grated
approx 6 cups of vegetable broth
In a soup pot, heat the olive oil on medium and add the onions. Stir around and cook 2-3 minutes until they start to become translucent. Remove the black seeds from the cardamon pods and crush slightly in a mortar and pestle. Add to onions along with a little salt and pepper.
Next add lentils, pepper and carrots to the pot. Keeping the pot on medium heat, stir ingredients so that everything is coated in the oil and onion mixture. Cook another 2-3 minutes stirring constantly so that the bottom doesn't stick.
Add the vegetable broth and cover the pot. Cook 15-20 minutes until lentils and carrots are fully cooked through and the soup looks blended together. If needed, add more broth to get the right texture and consistency. (If it looks like baby food, you need more liquid).
Serves 3-4.
Saturday, May 15, 2010
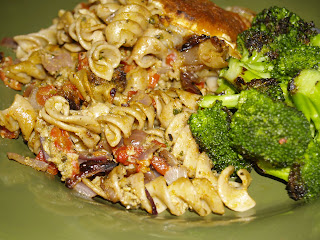
Pasta with Goat Cheese and Walnut Pesto
This one is so darn delicious you could probably feed it to any picky eater in the world and they wouldn't even notice how good it is for them. It is also really easy and fast!
Ingredients:
4 cups of whole wheat pasta (I prefer Fusili for this recipe)
1 cup walnuts
1/4 cup vegan pesto
1 handful of fresh basil and oregano
1 1/2 cup of roasted red peppers, chopped
1 red onion, chopped finely
4 cloves garlic
2-3 1/4 inch thick slices of good quality slightly aged Chevre
2 TBS of olive oil
Start this one off by cooking your pasta in boiling water per package instructions. Once it is done, strain in a colander and rinse lightly.
Meanwhile, in a food processor, blend the pesto, walnuts and fresh herbs and chop until the walnuts are chopped into small (but not fine) pieces and the mixture forms a paste. If it is too dry and won't blend well, you can add a little olive oil to the mix.
In a big cast iron skillet, warm the olive oil and add the red onion. Cook on medium heat until reduced and translucent. Add the garlic and cook 2-3 minutes longer.
Into the skillet with the onions and garlic, add the pasta, pesto walnut paste and red peppers. Mix thoroughly.
Add the Chevre on top of the pasta mixture and place the skillet under a low broiler for approximately 5 minutes, until the cheese is slightly melted and browned.
Should serve about 4, or two with leftovers for lunch.


Wednesday, May 05, 2010
Tasty Basic Tofu Recipe
For the longest time we never ate tofu at home because we couldn't find a good recipe for preparing it.
Finally, a couple of years ago in Edinburgh we learned this basic recipe from a couple of vegan friends and we have been making delicious tofu at home ever since!
Ingredients:
1 block of firm/extra firm tofu
1 lemon
2 cloves of garlic, minced
1 tbs of ginger, minced
1/2 cup of low sodium soy sauce or Braggs liquid amino acids (I use a half and half mix)
1/2 cup of water, or more if needed.
Slice your tofu into 1/4 inch pieces of whichever size you need for what you are serving the tofu with.
If you want an even firmer texture, you can press the tofu first, by placing the block of tofu between two plates in your sink, with the bottom plate inverted and a heavy cook book on top for approximately 30 mins.
Place your sliced tofu in a dish, spreading out the pieces slightly so that at least some of one side of each piece is exposed.
Cut the lemon in half and press over the tofu, making sure to get the juice evenly distributed. The lemon always needs to go first in order to open up the tofu and create a foundation of flavor.
Add the minced ginger and garlic, distributing evenly across the pieces.
Mix the soy sauce/liquid amino acids with the water and add over the top so that all the tofu is covered by the liquid.
Allow to marinate for at least 20 mins or for up to 2 days in the fridge.
To cook, you can fry your tofu in oil, add it to a stir fry, put the slices under your broiler, or add it to a soup. To add some extra texture, you can roll the pieces in flour or cornstarch before cooking. You can also roll the pieces in additional seasonings, such as spicy mesquite mix or sesame seeds before cooking.
Makes enough tofu for about 2 people. Enjoy!!
Monday, May 03, 2010
Citrus Curry with brown rice

This is a really delicious and slightly unique curry recipe. Its unusual flavor comes from the citrus, which you add rind and all. As an alternate, you can use orange slices instead of lemon and butternut squash (cubed with skin removed) in place of the yams. A credit for this one goes to my former roommate in London, Tanya, who introduced the idea of making curry like this to me.
Ingredients:
2 cups brown rice
4 cups of vegetable broth
2 TBS of olive oil
1 white onion, diced
1 red bell pepper, sliced (in the spring/winter when these aren't available locally, you can use canned roasted red peppers and add them with the coconut milk)
4 cloves garlic minced
1 thumb-sized piece of ginger, minced
1 lemon, cut into slices
3 small yams, washed and cubed (with skins left on)
1 can of coconut milk
One bunch of swiss chard
One hand full of cilantro, chopped
Spices:
2-3 tsp curry powder
1 tsp cardamon seeds, removed from the pod and slightly crushed
1 hot chili pepper, crushed
Salt and pepper to taste
Directions:
In a saucepan, add the rice and veg broth and simmer on medium heat until the liquid is absorbed and the rice is fully cooked.
While the rice is cooking, you can make the curry. Start by heating the oil in heavy bottomed pan on medium-high heat. Add the onions and cook until they start to turn translucent. Add the spices and stir until the onions are fully coated. Cook 2-3 minutes until the spices are very fragrant. Add the peppers and keep on stirring.
Next add the garlic, ginger, and lemon slices. Give the lemons a little squeeze when you add them to release a little juice.
Now add the yams and stir until fully coated with spice mixture. Add the coconut milk and cover, turning heat down to medium low. Stir occasionally to make sure that the bottom doesn't stick.
When the yams are *not quite* fully cooked (when you can almost slide a knife cleanly into the pieces), add the swiss chard to the top of the curry mixture and cover, cooking on low heat until the chard stems are fully cooked, but the leaves are still a bright green color.
Spoon a serving of rice into a bowl, and ladle the curry on top. Serve with a sprinkling of cilantro and the chard on the side.
Serves 4. Enjoy!


Monday, April 26, 2010
Curried Broccoli Salad

Ingredients:
2 cups of broccoli, chopped into small pieces
2 cups of cooked Garbanzo beans (or 1 can)
1/2 cup of onion (yellow or red), chopped finely
1/4 cup of golden raisins
1/4 cup of mayonnaise
1 tsp chili flakes
2 tsp of good quality yellow curry powder
salt and pepper to taste
one hand full of fresh cilantro, chopped
In a small bowl, combine mayonnaise, chili flakes and curry powder together to create a creamy dressing. Add together in a larger bowl with broccoli, beans, onion and raisins. Add salt and pepper to taste. Throw cilantro and a few sprinkles of chili flakes on top.
This salad can be served right away, or for better flavor, you can cover it and place in the fridge for one hour or more to allow the vegetables to absorb the spices. This one actually tastes even better the next day!
This salad serves four as a side dish.
Sunday, April 18, 2010
Veggie broth
This one is really easy. In a big stock pot, add one whole stock of celery, chopped into large chunks, one large onion chopped into large chunks, 2-3 bay leaves (depending on size), some fresh herbs (whatever you have, thyme, rosemary, etc.), and a pinch of sea salt. Fill the pot three quarters up with water. You can add 1-2 carrots too if you like.
Boil the heck out of it for 2-3 hours, continuing to add water as needed until you get a very rich golden broth.
You can store this in the fridge in mason jars and it will keep about a week. You can keep reboiling it each week with more water and more vegetables and pretty much keep it going forever. Homemade stock always on hand is a great thing to have around to add more taste to just about anything in the place of water.
Persian Rice with Butternut Squash and Black Beans
This one is an elaboration of a basic Persian rice recipe you can find in the old standby, the Joy of Cooking. This is a great and interesting way to make rice that is very tasty and unusual.
Ingredients:
2 cups of wild rice blend
6 cups (more or less) of veggie broth (I always do tomato-free because it agitates my migraines. See my recipe post on broth for simple instructions to make your own).
1 stick of cinnamon
3-4 whole cloves (or 1/4 tsp ground)
3-4 whole peppercorns
1/4 tsp cardamom seeds (remove from pods and crush slightly)
4 tbs butter
1 large white onion, chopped finely
1/2 cup of golden raisins
1/4 cup of pine nuts
pinch of salt (smoked if you have it)
pinch of saffron if you have it
1 butternut squash, sliced in half
pinch of crushed sea salt
2 cups of black beans, cooked (approx one can)
1 tsp of finely chopped fresh ginger
1 tsp of molasses
1 tsp sugar
1 tsp olive oil
Preheat oven to 350 Degrees F.
In a medium size pot, add rice, spices and veggie broth and simmer thoroughly, adding more stock as needed, until rice is no longer crunchy. This should take approximately 30 mins.
While your rice is cooking, in a heavy oven-safe skillet, melt 2 tbs of the butter and add the onions cooking gently on medium heat until they become browned. Add the pine nuts and raisins and other seasonings and turn heat down to low, stirring occasionally.
Once the rice is fully cooked, add it to the skillet and press down firmly with a spoon. Melt the remaining 2 tbs of butter and pour over the top. Cover skillet tightly with tin foil and place into oven at 350 degrees F for one hour.
While your rice is cooking, place squash halves onto a cookie sheet face down and cook at the same time until you can easily slide a fork into the flesh. This should take about 30-45 mins. Once squash is cooked, cut into cubes and sprinkle with sea salt.
While your rice and squash is in the oven, add sugar, molasses, oil and ginger into a small saucepan and cook on medium heat, stirring, until a sauce forms. Add beans and stir until they are coated with sauce. Cook on low heat, stirring frequently beans are fully heated through, adding a little water if needed to moisten.
Once rice is done, remove from oven and let sit for ten minutes. Invert onto a cookie sheet and cut into wedges.
Serve rice with squash on the side and the bean mixture poured over the top. To go with it, I would recommend some steamed greens and a dry white wine. Tasty!!
Thursday, April 15, 2010
Veggie Jumbalaya

Here is a tasty recipe for a kind of vegetarian variation on jumbalaya. Some credit for this one goes to my friend and fellow veggie Linda Thompson who shared the idea of this sort of dish with me last year. Served with fresh avocado, cilantro and crisp crostinis this dish is a great standby that you will love.
Ingredients:
2 Tbs olive oil
3 stalks of celery, chopped
1 red onion, chopped (white will work just fine too)
2 links of vegetarian sausage, sliced (spicy kielbasa or chorizo style is very good)
4-5 cloves garlic, crushed
2 red, yellow or orange peppers, chopped (or 1 large one)
red chili flakes, to taste
1 cup of small dark greens (eg. broccolini leaves or collards chopped into little pieces)
2 cups (or 1 can) of red kidney beans (cooked)
1-2 cups of veggie broth
1 avocado,sliced
1/2 cup cilantro, in pieces
slices of stale bread (any kind of crusty loaf that is not sandwich bread will do, eg. sourdough baguette is a particularly good choice)
6 cloves garlic
olive oil
2 cups brown rice of your choice
approximately 4 cups of water or veggie broth
This one is really easy to make. For starters, get your rice cooking in whatever manner you prefer. I like to keep it simple and do roughly one part rice to two parts water/broth on the stove top-- get it boiling and then turn down and simmer until the rice is fully cooked, adding a little more moisture if needed. Once cooked, turn off heat and allow to sit with the lid on for 5 mins and then fluff with a fork.
Once the rice is cooking, heat the olive oil in a large heavy skillet and add the onions, celery, veg sausage and garlic. Stir to cook evenly, but not too much in order to let the onions and especially the sausages brown and carmelize a bit.
Once nicely browned, throw in the peppers and chili flakes and stir around some more for a minute or two. Then, add the beans, greens, and broth and mix thoroughly.
At this point, you can let it be for about 5-10 minutes until everything in the jumbalaya is fully cooked through. While this is cooking, you can get your crostini going.
Place your sliced bread onto a baking sheet (stoneware works best). Brush the slices with olive oil. Crush the garlic generously and spread a little on each slice. Put under a hot broiler until toasty brown, usually about 2-3 mins (careful not to burn!). To get it really toasty, flip the slices over to toast the other side.
Once everything is all done, throw some rice is a big bowl with a ladle full of jumbalaya, a few slices of avocado, some cilantro and a few crostini. Top it off with your favorite hot sauce and dig in.
This should make enough for two people to eat dinner and have some leftovers for lunch.
Enjoy!!
Monday, April 12, 2010
Back on the Blogging wagon-- The Red Pepper is Born!
Hello everyone! I am sure no one reads our blog these days, since we haven't made a post in over a year! The reason for this is that in September 2008 we moved back to Portland, Oregon, ending our international adventures for the time being. These days, I (alletta) am working for an immigration attorney and slaving away at applying to law schools, and Ryan is working once more in the bike industry, as a sales associate at the Bike Gallery.
The other day, it occurred to us that this blog has become a bit of wasted space and that we ought to do something useful with it. Also, it occurred to me, that I am always making up all kinds of crazy recipes that turn out absolutely delicious, but that I never write these things down, resulting in my forgetting what I even did a few months later.
And so, a new purpose for Cute+Fuzzy has been born!
From now on, I am going to blog my tasty culinary exploits, with pictures and all, for my own future reference, and also for the free benefit of anyone out there who might enjoying trying them out too. This is especially the case for those out there who like myself, suffer from severe migraine headaches, find that diet plays a key role in improving their symptoms, and notice that good recipes that exclude problem ingredients are hard to come by.
A good idea of what you can look forward to on my new incarnation of this blog includes-- healthy vegetarian dishes that are migraine friendly (that is, that steer clear of Tyramine, which has been shown to cause severe headaches in many people, including myself). You can also look forward to lots of delicious recipes that focus on whole foods, local and seasonal ingredients and that are made from scratch whenever possible. I will also be sharing my adventures in home cheese-making and fresh pasta-making, as well as some of my experiments with homemade breads. Although I love to spend a Saturday slowly working through the steps of a particularly complex project, I promise there will also be plenty of quick and easy dishes too, given that I do have a full-time job.
I look forward to sharing my adventures with you! Let me know what you think!
love alletta
Subscribe to:
Comments (Atom)